Node.js:表單處理與檔案上傳(Form Handling and File Uploads)
16 Aug 2015表單處理與檔案上傳。
將用戶端資料傳送給伺服器
將使用者的資訊傳遞給伺服器有兩種方法:「查詢字串」(querystring)與「請求內文」(request body)。
- 查詢字串(querystring)
- 使用 GET 方式傳送表單資料。
- 表單資料會直接顯示在瀏覽器網址列上,因此可以被暫存、書籤起來或留存在歷史紀錄中。公開透明,敏感資料不適用。
- 由於在瀏覽器網址列有長度的限制(最大 URL 長度是 2048 characters),只適合資料量小的情況。但也因資料量少,速度快。
- 資料只允許 ASCII characters。
- 請求內文(request body)
- 使用 POST 方式傳送表單資料。
- 表單資料不會直接顯示在使用者可以看到的地方,而是放在 HTTP message body 裡面。
- 無資料量限制。
- 資料可為 binary data,因此可傳輸多媒體檔等檔案格式。
看起來似乎使用「查詢字串」的 GET 方式傳送表單資料是不安全的,而使用「請求內文」POST 方式傳送表單資料是安全的。但實際上,兩者只要使用 HTTPS 都是安全的,兩者不使用 HTTPS 都不是安全的。因為如果不使用 HTTPS,我們依然可以看到 POST 的內文資料,容易度與得到 GET 查詢字串無異。
總而言之,基於資料傳輸量的限制和保持瀏覽器網址列的簡潔乾淨,建議使用「請求內文」POST 方式傳送表單資料。
補充說明
- HTTP Methods: GET vs. POST:想了解 HTTP GET/POST 基本概念可以看這篇文章。
- 淺談 HTTP Method:表單中的 GET 與 POST 有什麼差別?:關於 HTTP GET/POST 基本概念,如果英文版的看不習慣,這篇是中文版的。
- HTML 表單中 GET 與 POST 的用法差異:想了解在表單處理上,GET/POST 的差異可以看這篇文章。
範例表單的 HTML 如下。
<form action="/process" method="POST">
  <ul>
    <li>
      <input type="hidden" name="hush" val="hidden, but not secret!" />
    </li>
    <li>
      <label for="fieldColor">
        Your favorite color:
        <input type="text" id="fieldColor" name="color" />
      </label>
    </li>
  </ul>
  <button type="submit">Submit</button>
</form>
- 如果沒有在表單
<form>的 method 屬性指定使用的方法(GET 或 POST),預設會是 GET。 - 如果沒有在表單
<form>的 action 屬性指定路徑(在本例中為/process),預設表單傳送的路徑會與載入表單的路徑相同。因此建議一定要設定(無論使用 form post 還是 ajax 傳送表單),避免資料遺失。 - 伺服器以
<input>的 name 屬性來辨識欄位。 - 在本例中,當使用者按下 Submit 按鈕提交表單時,
/processURL 會被呼叫,欄位值會使用 POST 方式在請求內文中被傳送至伺服器端。
編碼
當表單被提交的時候,它必定會以某種方式編碼。
- 如果沒有特別指定,預設會使用
application/x-www-form-urlencoded。這種編碼方式專門用來編碼 URL 且 Express 支援。 - 上傳檔案則需使用
multipart/form-data。由於 Express 即將不支援且不建議使用,因此之後會討論替代方案。
補充說明
- 四種常見的 POST 提交數據方式:這篇文章把四種常用的編碼方式(application/x-www-form-urlencoded、multipart/form-data、application/json、text/xml)講解得非常清楚。
表單的處理方式
- 使用同一個路徑來處理傳送 / 回應表單:form post(傳送表單資料)、form get(取得傳送後的回應)。
- 使用不同路徑來處理傳送/回應表單
- 傳送表單的方法:由於使用不同路徑來傳送和回應表單,因此傳送表單使用 form post 或 get 皆可,但依舊不建議使用 GET,除了資料容量限制外,也避免將敏感資訊直接暴露在瀏覽器網址列上。
- 回應表單的方法
- HTML 回應:直接將 HTML 傳回給瀏覽器。若使用者重新整理頁面會出現警告、干擾書籤、回上一頁的功能,不建議使用。
- 302 Redirect:302 表示「暫時轉頁」,但在處理表單上是濫用 302 的意義,因此建議改用 303。
- 303 Redirect:這是比 302 更好的解法,303 的意義為「通知 Client 端到另一個網址去查看上傳表單的結果」。而我們可在提交表單後轉跳到:
- 重新導向至專用的成功 / 失敗頁面。優點是易於分析與實作,缺點是需針對每個狀況設計、實作與維護頁面。
- 重新導向至原本的頁面,並使用一個閃爍的訊息(flash message)。為了不中斷使用者的瀏覽歷程,可用 ajax 提交表單而不需轉跳到其他頁面,或使用 form post / get 提交表單並導向原本的頁面,然後提示。
- 重新導向至新的位置,並使用一個閃爍的訊息。同上,可以使用 ajax 提交表單,或使用 form post / get 提交表單,然後將使用者帶往下一個流程頁面。
補充說明
- 網頁開發人員應了解的 HTTP 狀態碼:保哥整理了 HTTP 狀態碼並做了詳細說明,但沒用到通常不會太仔細看啦(笑)。
使用 Express 處理表單
Server 端以「name」這個屬性來辨識 HTML Form 的欄位。例如,如下範例,<input type="text" name="name"> 就是以 req.query.name 傳遞給 Server 端。
安裝與設定 body-parser
如果使用 POST 來傳送表單資料,必須要有 middleware 來解析以 URL 編碼的內文。因此要安裝 body-parser。
npm install --save body-parser
然後在 app.js 把它 include 進來:
app.use(require('body-parser')());
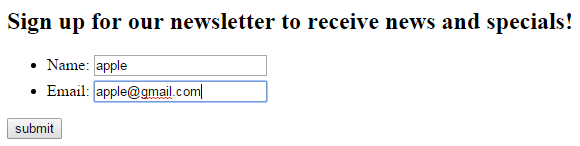
我們準備一個表單供使用者填寫後提交。這裡有一個隱藏的欄位「_csrf」,它並不會讓使用者直接在畫面上看見,但傳送表單的時候會將此欄位傳送出去。
備註:由於部落格會把花括號吃掉,因此在左右加一個點,例如「.{.{ }.}.」。
<form class="formNewsLetter" action="/process?form=newsletter" method="POST">
  <div class="formContainer">
    <h2>Sign up for our newsletter to receive news and specials!</h2>
    <input type="hidden" name="_csrf" value=".{.{ csrf }.}." />
    <ul>
      <li>
        <label> Name: <input type="text" name="name" /> </label>
      </li>
      <li>
        <label> Email: <input type="text" name="email" /> </label>
      </li>
    </ul>
    <input type="submit" value="submit" />
  </div>
</form>
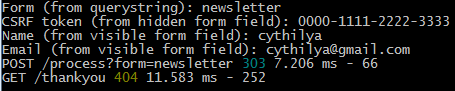
在 app.js 中做 router 設定,當表單傳送到 Server 端後,印出欄位值,最後會導到「thankyou」這個成功頁面。
app.post('/process', function(req, res) {
  console.log('Form (from querystring): ' + req.query.form);
  console.log('CSRF token (from hidden form field): ' + req.body._csrf);
  console.log('Name (from visible form field): ' + req.body.name);
  console.log('Email (from visible form field): ' + req.body.email);
  res.redirect(303, '/thankyou');
});
一開始在畫面上會先代入 _csrf 這個欄位的值。
// get index page
router.get('/', function(req, res, next) {
  res.render('index', { title: 'Index', csrf: '0000-1111-2222-3333' });
});
這當中我們沒有使用 client 端的 JavaScript 任何的協助,純粹只是用表單原生的 POST 功能。
Demo
填寫表單,填寫完成後送出。

Server 端收到 Client 端 POST 過來的資料,並轉到「thankyou」這個成功頁面。
補充說明
處理 Ajax 表單
在上一個例子中,使用 表單原生的 POST 功能,而接下來要改用 ajax 來處理表單。
我們一樣準備一個表單供使用者填寫後提交。
備註:由於部落格會把花括號吃掉,因此在左右加一個點,例如「.{.{ }.}.」。
<form class="formNewsLetter" action="/process?form=newsletter" method="POST">
  <div class="formContainer">
    <h2>Sign up for our newsletter to receive news and specials!</h2>
    <input type="hidden" name="_csrf" value=".{.{ csrf }.}." />
    <ul>
      <li>
        <label> Name: <input type="text" name="name" /> </label>
      </li>
      <li>
        <label> Email: <input type="text" name="email" /> </label>
      </li>
    </ul>
    <input type="submit" value="submit" />
  </div>
</form>
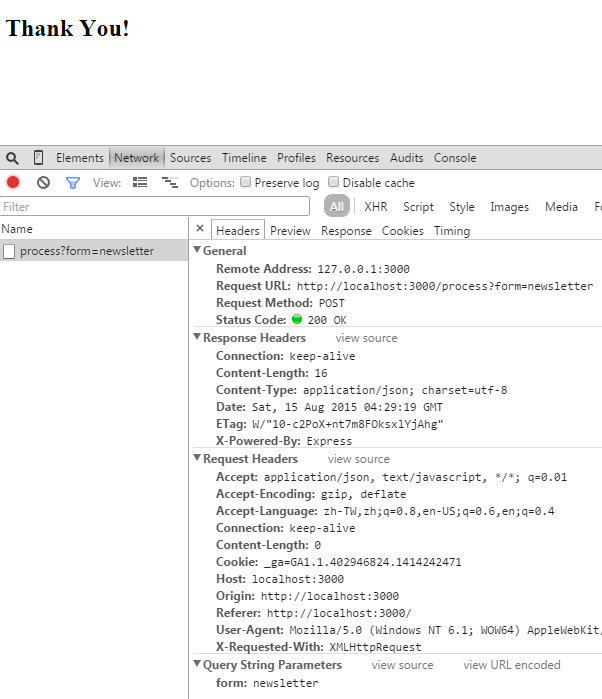
在 script.js 中,使用 ajax 提交表單後,如果成功的話,就顯示成功訊息,如果失敗就印出錯誤訊息。
var dFormNewsLetter = $('.formNewsLetter');
dFormNewsLetter.on('submit', function(e) {
e.preventDefault();
var dThisForm = $(this),
action = dThisForm.attr('action'),
$container = dThisForm.find('.formContainer');
$.ajax({
url: action,
type: 'post',
data: {},
dataType: 'json',
error: function(xhr) {
alert('error: ' + xhr);
},
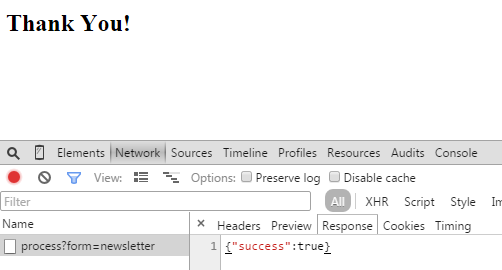
success: function(response) {
if (response.success) {
$container.html('<h2>Thank You!</h2>');
} else {
$container.html('There is a problem');
}
},
});
});
在 app.js 中,這裡有一個判斷式 req.xhr || req.accepts('json, html') === 'json' ,意即,如果是使用 ajax 請求的話,req.xhr 與 req.accepts('json, html') === 'json' 皆為 true,那麼就發送成功訊息 { success: true} ,畫面會直接 append 一段程式碼 <h2>Thank You!</h2> 表示表單傳送成功;如果為 false,表示為 form post,則轉跳到「thankyou」頁面。
app.post('/process', function(req, res) {
  if (req.xhr || req.accepts('json, html') === 'json') {
    res.send({ success: true });
  } else {
    res.redirect(303, 'thankyou');
  }
});
這段主要是說明 req.accepts() 會去判斷哪一種回應的類型是最好的,而我們這邊是設定最佳回傳格式是 JSON 或 HTML。當 Server 端收到 Accept HTTP Header 後就會做出判斷。所以,如果是 ajax 請求,或 client side 要求 JSON 或 HTML 或更好的回應,則回應 JSON 物件 { success: true} ,否則就轉跳到「thankyou」頁面。
Demo
填寫表單,填寫完成後送出。
送出成功,回應「Thank You!」訊息。
檔案上傳
檔案上傳有以下兩種方法
- Busboy 或 Formidable。因為 Formidable 比較簡單,所以在這裡我們選用 Formidable。
- FormData,可參考-FormData。
安裝 Formidable
npm install --save formidable
設定與使用 Formidable
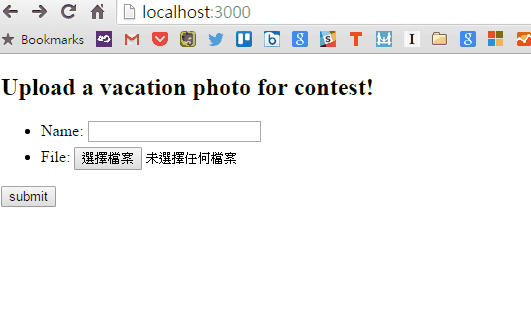
我們一樣準備一個表單供使用者填寫後提交。因為檔案上傳為 binary data (在此為接受所有圖檔),所以資料編碼使用 multipart/form-data 格式。
備註:由於部落格會把花括號吃掉,因此在左右加一個點,例如「.{.{ }.}.」。
<form
  class="formUpload"
  enctype="multipart/form-data"
  method="POST"
  action="/contest/vacation-photo/{year}/{month}"
>
  <div class="formContainer">
    <h2>Upload a vacation photo for contest!</h2>
    <input type="hidden" name="_csrf" value=".{.{ csrf }.}." />
    <ul>
      <li>
        <label>Name: <input type="text" name="name"/></label>
      </li>
      <li>
        <label>File: <input type="file" name="photo" accept="image/*"/></label>
      </li>
    </ul>
    <input type="submit" value="submit" />
  </div>
</form>
在 app.js 處理 router 的部份。
var formidable = require('formidable');

app.get('/contest/vacation-photo', function(req, res) {
  var now = new Date();
  res.render('cpntest/vacation-photo', {
    year: now.getFullYear(),
    month: now.getmonth(),
  });
});
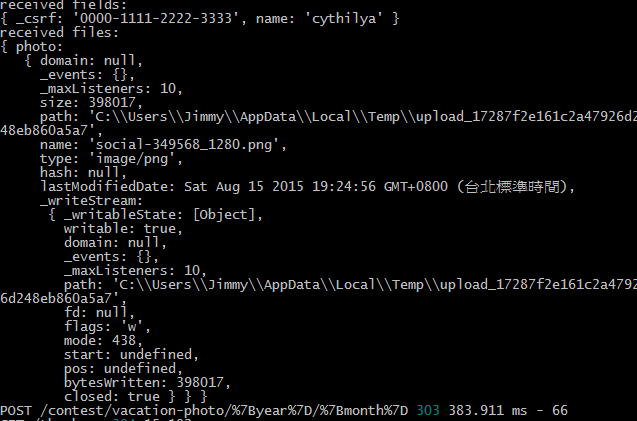
取得表單後要做解析,若成功則轉至成功畫面,否則轉跳到錯誤畫面。
app.post('/contest/vacation-photo/:year/:month', function(req, res) {
  var form = new formidable.IncomingForm();
  form.parse(req, function(err, fields, files) {
    if (err) {
      return res.redirect(303, '/error');
    }
    console.log('received fields: ');
    console.log(fields);
    console.log('received files: ');
    console.log(files);
    return res.redirect(303, '/thankyou');
  });
});
Demo
補充說明
- 自學 Node.js 五:學習 node-formidable:Formidable 的使用和說明。
jQuery 檔案上傳
我們可能想用一些比較花俏的介面來做檔案上傳的動作,例如可以拖曳、上傳進度或馬上看到上傳後的縮圖。那麼就可以使用一些 jQuery Plugin 來完成。
UI 部份
- 檔案上傳使用 jQuery File Upload
- 顯示縮圖使用 ImageMagic
安裝 jquery-file-upload-middleware
npm install --save jquery-file-upload-middleware
設定與使用 jquery-file-upload-middleware
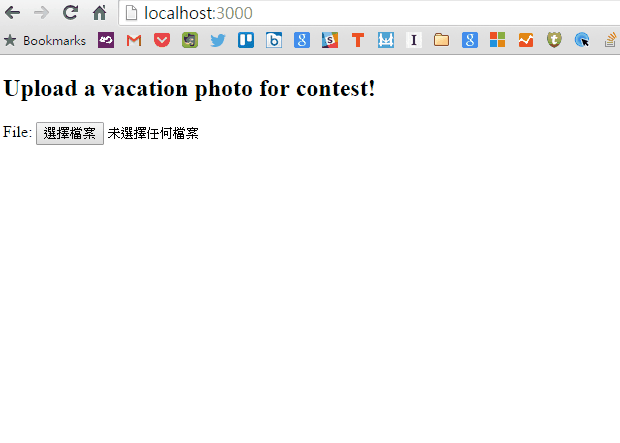
準備一個表單供使用者填寫後提交。這段程式碼和之前的沒有什麼差異 :(
<form class="formUpload" enctype="multipart/form-data" method="POST">
  <div class="formContainer">
    <h2>Upload a vacation photo for contest!</h2>
    <label>
      File:
      <input
        type="file"
        id="fieldPhoto"
        name="photo"
        accept="image/*"
        data-url="/upload"
        multiple
      />
    </label>
    <div id="uploads"></div>
  </div>
</form>
在 app.js 中處理 router 的部份。相關文件可以參考-jquery-file-upload-middleware。
var jqupload = require('jquery-file-upload-middleware');

app.use('/upload', function(req, res, next) {
  var now = Date.now();
  jqupload.fileHandler({
    uploadDir: function() {
      return __dirname + '/public/uploads/' + now;
    },
    uploadUrl: function() {
      return '/uploads/' + now;
    },
  })(req, res, next);
});
我們會將檔案先傳到 local 端的 public 資料夾裡面,亦即 uploadDir 所回傳的路徑,並且在裡面用 now 這個隨機變數分更多資料夾,然後將圖檔存在裡面。而對外的公開路徑是 uploadUrl 所回傳的路徑,例如:http://localhost:3000/uploads/1439806832819/node-form-handling-and-file-uploads.jpg。
在 script.js 中,上傳成功後,將上傳成功的檔名列印在畫面上。
var dfieldPhoto = $('#fieldPhoto');

dfieldPhoto.fileupload({
  dataType: 'json',
  error: function(xhr) {
    console.log(xhr);
  },
  success: function(response) {
    console.log(response);
  },
  done: function(e, data) {
    $.each(data.result.files, function(index, file) {
      $('.formContainer').html($('<div class="upload">File uploaded: ' + file.name + '</div>'));
    });
  },
});
Demo
這篇文章的原始位置在這裡-Node - 表單處理與檔案上傳(Form Handling and File Uploads)
由於部落格搬遷至此,因此在這裡放了一份,以便閱讀;部份文章片段也做了些許修改,以期提供更好的內容。

